Showing posts with label Recipe. Show all posts

Wednesday, November 20, 2013

Wednesday Wellness / Sinless

via
Eat well, keep active and enjoy something that's not on your usual healthy eating list once in a while. Depriving yourself is not the way to go, we all know that. If you deprive yourself consistently you will inevitably binge and that's horrible for anyone's metabolism. So now and then spoil yourself.  Sweet treats don't have to be loaded with "bad stuff" either, like this healthy indulgence.
These treats are heavenly in every way - sin free and delicious - from Jenna Zoe's decadently healthy cookbook, Super Healthy Snacks and Treats.

Chocolate Caramels

Makes about 6

200g/1 cup of dates, stoned
1 tablespoon of smooth peanut butter (look for unsweetened, made without any hydrogenated oils)
1 tablespoon of coconut oil
1 pinch of salt
250g/9oz. dark/bittersweet chocolate (preferably sweetened with unrefined sugar, or unsweetened if you can't have sugar)
1 chopped freezer-proof baking sheet or plate, lined with clingfilm/plastic wrap

How to make

  1. Put the dates in a bowl of room-temperature water and allow them to soak for a few hours. They will soften and absorb some of the water, which will help when making the caramel.
  2. Rinse the dates and put them in a food processor. Blitz until smooth, scraping down the edges of the bowl as you go.
  3. Once the dates have started to form a paste, add the peanut butter and continue to pulse.
  4. Lastly, add the coconut oil for texture and the salt to bring out the flavour.
  5. Process again until the mixture naturally forms a large ball.
  6. Pull off bite-size pieces of the mixture with your fingers and roll them into neat balls. Lay them out on the prepared baking sheet and freeze for at least 30 minutes.
  7. Meanwhile, put the chocolate in a heat-proof bowl over a saucepan of barely simmering water. Do not let the base of the bowl touch the water. Leave until melted and completely smooth.
  8. Remove the chilled caramel balls from the freezer. Place 1 caramel on a spoon and dip it into the melted chocolate so that it is completely and evenly coated. Return the ball to the prepared baking sheet. You can use 2 teaspoons to help shape the chocolate coating if that helps.
  9. Repeat with the remaining caramel balls, then freeze for at least 20 minutes to give the chocolate and caramel layers enough time to harden properly. Once they've frozen, you can transfer them to a freezer bag.
  10. Remove the caramels from the freezer just before serving. Store them in the freezer for up to 2 weeks.

Tuesday, November 19, 2013

Recipe: Overnight Oats


Sugar free, bake free, fuss free, dairy free and packed with nutrients. Here's how to make a time-saving, power-packed brekky.  And yes, you guessed it - it's Vegan!

Overnight Oats

Dry mix:
Organic, raw oats
Chia seeds
A handful or 2 of Sunflower seeds
2 or 3 handfuls Psyllium husk
2 or 3 handfuls Linseed
Ground cinnamon to taste

Combine all dry ingredients into an airtight container to be ready when you are.

Serves 1:
1/3 cup dry oat mix
1/3 cup unsweetened almond milk
frozen mixed berries
Organic coconut flakes (if you like)

In a small container combine oats and unsweetened almond milk. You can place the berries in now or first thing in the morning - I like to place them in overnight, that way their juice sweetens the oats. Cover your container and place in the fridge - allow oats to set overnight. To serve, sprinkle some organic coconut flakes (and your berries if you hadn't put them in overnight) and you're good to go.
 

Monday, October 21, 2013

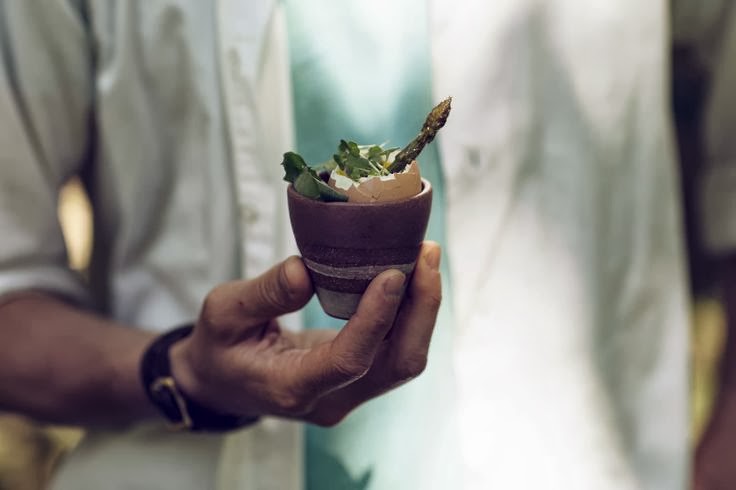
Eggs for Two

via
If you had to swoon me, seat me in the sunshine where the scent of a fresh coffee weaves itself around our breakfast for two.


Recipe: The Summer Egg

Ingredients 2 eggs
Asparagus, handful
Dandelion greens, handful
Olive oil, drizzle
Salt, to taste
Pepper, to taste

Method Preheat oven to 400 degrees. Break off the ends of the asparagus stalks, drizzle with olive, and toss with a pinch of salt and pepper. Place on a baking sheet and roast for about 15 minutes, or until tender, but with a slight crunch. While the asparagus is cooking, bring a small pot of salted water to a boil. Place eggs in boiling water for 5 minutes. After 5 minutes, remove from the water, cut off the tops, and serve over lightly dressed dandelion greens. Place one stalk of asparagus in each egg and season to taste.
Serves 2
via Kinfolk

Friday, September 20, 2013

Found (and I'll be back soon!)


Before I set off into the European sunsets for a couple of weeks, I've got a few things to share.

1. BBC shows off the latest must-have gadget instead of an iPad...a pack of A4 paper.Oops!
2. Hands down, this is the most fun you will have in your office today - playing dot-to-dot!
3. More (polka) dots and beautifully styled ladies at Milan Fashion Week.
4. This Apple Tart looks mighty fine. Apparently the maker of this tart is the Apple-Tart-Queen according my go-to blogger for all things cake at Cupcakery blog.

I've lost the links to both images! Will try to update as soon as I find them.
Well kiddos, I'm feeling like I've been swinging around with party balloons all week. I'm ready to scoot off to the sunsets of Cyprus with my...fiance! This is something sugary-sweet I'm still getting my tongue around (the word fiance, not Cyprus sunsets)! Plus, if you hadn't heard, I said YES to my incredible man as our love-lock was sealed with a stunningly-perfect digit accessory.

I'll see you on the other side of 12 days! Be good and keep the light, bright n' happy stuff in your days.

Maria x

Wednesday, July 31, 2013

Whole30 Wednesdays / Kale

This week it's all about Kale. The green stuff that ticks all the good-for-you boxes.

Kale has been a lifesaver during my Whole30 days. My favourite (quickest and easiest) way to use it is mixed into chicken broth - a delicious and quick mid-week meals. Here 's the recipes...

Recipe #1 Maria's Chicken Broth with Kale and Coconut Oil:

Directions: Boil up a chook (add a little salt and pepper to the stock). Once this is ready (an hour or so later) get a smaller saucepan ready to prep your single-serve of soup. Keep the rest of the stock in the fridge (or freezer) for quick soups all week long.

Single-serve soup:
Fill a small saucepan with stock (enough to fill your soup bowl)
Add some boiled chicken pieces
Chop some raw garlic (I like about 1/2 a clove, but I'm a bit strange like that)
Add a bunch of herbs (your pick)
Chop and add Kale
Add broccoli/snow peas (any greens go nicely in this)
Stir in a tablespoon (or less) of Coconut Oil
Add a dash of Sesame Oil to taste (optional)

Once the greens have just cooked through, serve immediately and sprinkle in freshly chopped spring onion.

Recipe #2 A sneaky Kale Snack:

Place washed and dried kale leaves (not the stems) on a baking sheet. Drizzle with olive oil and sprinkle sea salt. Bake on high for 10-15 min until crispy. Very addictive!

Wednesday, June 19, 2013

Whole30 Wednesdays

via
Anyone been eating the Whole30 way? If not, I can totally understand. But you're missing out on one thing...this "ice-cream" recipe, completely dairy, sugar and guilt free!


Ingredients (Serves 4) :
  • 4 ripe bananas, peeled and sliced into thin rounds
  • 1/4 cup roasted almonds, finely chopped
  • 2 tablespoons plus 2 tsp maple syrup, divided (if you're on Whole30, just leave this out)
  • 1/2 teaspoon coarse sea salt
  • 1/2 cup unsweetened almond milk
  • 1 teaspoon pure vanilla extract (again, Whole30 eaters may swap this for a fresh vanilla pod)

Prep:

  1. Place banana slices in a single layer on a plate or tray lined with parchment or wax paper; freeze at least 3 hours. 
  2. In a bowl, combine almonds, 2 tsp syrup and salt. In a food processor, pulse frozen banana slices, milk, vanilla and remaining 2 tbsp syrup, scraping down the sides as necessary, until mixture is the texture of soft-serve ice cream. 
  3. Spoon into bowls; sprinkle with almond mixture. You're done.

Wednesday, May 15, 2013

What I've been up to / Autumn gatherings

baked eggs, brekky salad, fresh baked pain d'epi, homemade butter and a fresh brew of coffee.

brekky salad of avocado halves, crisp prosciutto, fresh ricotta and snow pea sprouts.

tablecloth - butchers paper with scribbled menu

I'm a total sucker for the experience of wining and dining in aesthetically-pleasingly-perfect surrounds. But it's not only about picking some fine nosh and wine. The happenings around our table matter too, if not more - the moments, the laughs, discussions and memories made.  Last Sunday's autumn (Mother's Day) gathering was spent in rustic brilliance...if I may say so myself. I pulled my Pain D'Epi loaf from the oven to accompany two versions of baked organic eggs and teamed it all with made-from-scratch ricotta over a brekky salad with a side of homemade butter (yes, jar-shaken with a pinch of salt). If you're gonna do things right, you may as well make your own butter!

The sweetest part of this gathering for a few was bringing together the food I believe in with a perfectly mismatched table setting and having everyone enjoy it as much as I did prepping it.

Recipes if you're interested:
Ricotta in 15 minutes
Pain D'Epi sea salt and olive oil French bread

Tuesday, April 30, 2013

Recipe: Chia seed, date & walnut slice


Recipe
No bake, wheat-free, dairy-free, totally vegan sweet treat in 10 minutes! You heard! This recipe packs a punch in the sweets department and is a seriously top craving killer. Wait until you try it, I can almost guarantee you won't think this is an alternative to the standard sugar crammed, cream topped desserts. It tastes way too good.

FYI - this isn't something to munch on when undertaking Whole30 unless you eliminate the oats and sugar.

Ingredients:
  • 170g rolled oats
  • 100g walnuts
  • 40g shredded coconut
  • 45g chia seeds
  • 1 teaspoon ground cinnamon
  • 1 tablespoon unsweetened cocoa powder, sifted
  • 2 teaspoons natural vanilla extract
  • 500g pitted dates, chopped
  • pure icing sugar for dusting (optional)

  • How to:
    1. Put oats, walnuts, coconut, chia seeds, cinnamon, cocoa and vanilla into a food processor and process until all ingredients are finally chopped
    2.With the motor running, start adding the dates a few pieces at a time, processing until all the dates have been added and the mixture is starting to come together. Use your hands to bring it together completely, adding 1-2 teaspoons of cold water if necessary.
    3. Press the mixture evenly into a lined (with baking paper) round 20cm (8 inch) cake tin, smoothing the surface firmly with the back of a metal spoon. Cover and refrigerate until ready to serve.
    4. To serve, dust with icing sugar and cut into thin wedges.

    Tuesday, April 16, 2013

    What I've been up to

     
    If you're interested (which is possible), here's my ramble on the things consuming my past-little-while.
     
     
    via
    1. Guest posting - my first, by the way. The ever so lovely Amanda Rose from Sew Much To Say asked me to write about my interpretation of Martha Stewart's New York style cheesecake. See it here. If only I'd seen Martha's video first!
     
     
    iphone
    2.  Hey, yeah! I took a minute to sit back, breathe and stop glorifying 'busy'.
    The view from my lunch break went something like this: bright blue sky, palm trees and perfectly plane-drawn lines.
     
    sory about the iphone quality...
    3. Coffee and a book. Solo.
     
    4. I got new kicks. Well, I got a few (the savings are going fine, thank you). Aside from introducing my much-longed-for Hunter Boots and other penny spends to my wardrobe, I got myself some shiny new ballet points. I understand this might not tickle every one's fancy but breaking in (by breaking in, I mean breaking wood) these newbies was topping the list of satisfiers. Yea, that includes blisters.
     
    5. Simplifying. Remember my motto for 2013? It's not always easy to turn a shoulder to the things that have become tag-alongs in my world.
     
    via
    6. Movies and I are not so compatible; I'm a fidgeter, a doodler, a daydreamer.  First Position, however, had my eyes glued for the 2 hours it rolled for; all about 6 brilliant kids competing for their chance to 'make it' in the professional ballet world. I'm not a huge supporter of ballet competitions - I don't think it's what the art is about, BUT the talent in this documentary was incredible.

    7. Keeping healthy...relatively healthy. I've relaxed on my healthy-living-rules recently and am finding it a struggle to keep things in a balanced (fitness) perspective. If anyone has a tip or two on keeping calm, looking forward and not focusing on the irritatingly-less-than-ideal-body-image I currently hold, I'd be glad to hear them.

    via
    8. Stretching. Never underestimate the power of a good stretch. Ever.
     
     And that's about it. Hope you've been up to all sorts of great things?

    Friday, April 5, 2013

    Friday's Finds

    
    via

    It's Friday! It's Friday! It's Friday! And here are my finds...

    via
    1. Salty-sweet-lemon-biscuits! If you try them, let me know.

    via
    2. Portfolio envy: Jason Booher's conceptually fantastic work.

    via
    3. Have you seen Jac & Jack's a/w13 collection? This duo has done it again. Their new threads for 2013 have been hitting my browser all week - put effortless, simple lines with just enough femininity to balance out the masculine and I'm all over it. I feel a wardrobe update coming on...
     
    Hope everyone's weekend is spent doing all sorts of wonderful things! Maria x

    Thursday, January 24, 2013

    Recipe: 4 tier chocolate layer cake

     photo cake1_zps917e3a92.jpg

    My wonderful mum celebrated her birthday yesterday and I wanted to whip up a little treat to show her just sweet I think she is. If I was going to do this right, Donna Hay's 4 tier chocolate layer cake was the only way to go! Believe me when I say this can be done - quite simply at that! The kind-to-first-timers-recipe makes things a whole heap easier to tackle. Being a tad pedantic for bakers-perfection can possibly, just maybe have something else to do with the whole thing standing upright! A little effort for a whole lotta gain, though.

    Ingredients:
    • ½ cup (125ml ) water
    • 60g butter, chopped
    • 2 tablespoons cocoa, sifted
    • 1 cup (150g) plain (all-purpose) flour, sifted
    • ½ teaspoon bicarbonate of (baking) soda, sifted
    • 1 cup (220g) caster (superfine) sugar
    • 1 egg
    • ¼ cup (60ml) buttermilk
    • ½ teaspoon vanilla extract
     
    chocolate cream cheese frosting:
    • 50g butter, softened
    • 250g cream cheese
    • 1 cup (160g) icing (confectioner’s) sugar mixture, sifted
    • ¼ cup cocoa, sifted
    The fun part:

    Preheat oven to 150°C (300°F).
    Place water, butter and cocoa in a saucepan over medium heat and stir until the butter has melted. Place the flour, bicarbonate of soda and sugar in a bowl, add the cocoa mixture and whisk to combine. Add the egg, buttermilk and vanilla and whisk to combine.
    Divide mixture between 2 lightly greased 12cm round cake tins lined with non-stick baking paper. Bake for 40–45 minutes or until cooked when tested with a skewer. Allow to cool in the tins for 5 minutes. Turn out onto wire racks to cool completely.

     photo cake3_zps942b996d.jpg
     
    While the cake is baking, make the cream cheese frosting.
    Place the butter and cheese in the bowl of an electric mixer and beat for 6–8 minutes or until pale and creamy. Add the icing sugar and cocoa and beat for a further 6–8 minutes or until light and fluffy.

     photo cakeclose_zps5de93dd6.jpg


    To assemble, slice the cakes in half horizontally. Place one cake layer on a plate and spread with one quarter of the frosting. Repeat with remaining layers and frosting. Decorate as desired. A few raspberries and a dust of icing sugar did the trick for me! Recipe link.

    p.s. I made 4-times the amount as the recipe only fills a 12cm round tin.

    If anyone gives this one a go, I'd be interested to hear how your layers stacked up! x


    Friday, January 18, 2013

    Friday's finds

     photo flowergirl_zps1d311972.jpg
     
     I've been a busy pinterest-bee this past week. Since deactivating my facebook account and dealing with a temperamental instagram app, I've coped almost entirely social-media-free...with the exception of the odd sticky beak at Pinterest's links. Here are some of my finds - just the thing to soak up a few minutes and get us over the 5pm-finish-line a little easier.

    1. I don't blame this foodie for having the most delicious looking Niu Rou Mian (beef noodle soup) every day for one whole week.

    2. I've never believed in wall stickers...these Sewing kit vinyl wall stickers haven't convinced my otherwise.

    3. You're now one click away from a tonne of inspiration and mind-blowing-beautiful snaps at Sterling Style. I mean it!

    Photobucket
    via
    Before I make a run for the weekend, I'd like to send a huge bunch of thanks to you for your following and blogger support!
    Have a wonderful weekend, whatever you're up to. x

    Wednesday, October 24, 2012

    Spring baking


    Baking is high on my to-do list whenever I have a little extra time to swan about doing not too much at all. Thanks to a weekend filled with these extra minutes it seems I've finally cracked the code on baking a perfectly risen, most delicious of country loaves. In fact I threw my own little spin on things and transformed this beauty into an Olive Loaf. Here's how...

    The wet ingredients:
    To make the yeast combine 7g dry yeast in 1/2 cup warm water with 1 teaspoon of soft brown sugar. Put this aside to work its magic for 10 minutes or so. I spent a good few minutes soaking up the spring sun whilst I waited...


    Reading a little Bach, soaking some UV and sipping back a coffee while I wait. Absolute perfection in my books.
     The dry ingredients:
    Incorporate 2 cups plain flour, 2 cups wholemeal flour, 1 teaspoon salt, 1 teaspoon sugar before adding 1 more cup of water and the yeast mixture. This is where I added some chopped olives. Give this a little mix with a wooden spoon until you can start kneading it on a floured surface.
    Once combined, place the dough in a lightly oiled bowl and set aside for 20-40 minutes covered with a damp tea towel, or until doubled in size. Again, the perfect excuse to soak up a little UV! Once the time is up, knock back the dough and kneed again for only a few minutes. Shape it however you wish (round is generally the go), and place on a lightly dusted (with flour) baking tray. Cover with the tea towel and set aside for another 20-40 minutes. Then you're ready to place it in a preheated 180degree oven for 20 or so minutes. I like to lightly oil the loaf and dust with a little flour before baking.


    The perfect accompaniment to our Sunday roast, enjoyed in the most beautifully still night amongst our spring garden blooms.

    //all pictures via my iphone

    Wednesday, August 29, 2012

    Recipe: Choc Brownies with Chipotle Ganache

    
    via
     For those who don't know, I've been on a health kick - minimal carbs, less sugars and more greens have been the go and so far things are looking good. Unfortunately for me, cravings for the odd chocolate-dipped-anythings aren't fading so I went searching in the one direction I knew would serve up the goods minus the guilt - raw food recipes! I've always been intrigued by a raw food diet but was always a little afraid of letting go of the cooked stuff. I know I won't ever be a complete raw-convertee but I sure can see my cooking repertoire expanding thanks to discovering this site. First to be trialed will be the craving-crusher, butter-and-gluten-free, totally raw Chocolate Brownies drenched in Chipotle Ganache. Yep, I did say butter and gluten free!
    
    via
     Choc Brownies with Chipotle Ganache

    Ingredients:
    2 cups walnut pieces
    1 cup cocoa
    1 tsp cinnamon
    1/2 tsp chipotle powder
    Pinch of coarse salt
    2 cups Medjool dates, pitted (do not substitute these for the drier, smaller ones)
    1/2 cup dried figs
    1 tsp vanilla
    1 tbsp Agave nectar (or honey)

    Ganache:
    1/2 cup whipping cream
    1/2 cup plus a bit more, chopped dark chocolate
    1/4 tsp chipotle powder
    1 tbsp Agave nectar (or honey)
    In a food processor, add the walnuts and process until fine. Add the cocoa, and process more (scrape the sides down). Add chipotle, cinnamon and salt; process until combined. Add the dates and figs, 1/2 cup at a time, scraping after each addition. Add the vanilla and agave. Add a touch more agave if still dry. Press into a 8x8 inch square pan. Set aside while you make the ganache.
    Ganache preps: combine chocolate, chipotle and agave. In a saucepan, heat cream until it starts to simmer. Pour over the chopped chocolate mixture and stir very well. When it is smooth, pour ganache over the brownies, smooth the top and refrigerate for 50-60 minutes until set. Cut into squares and there you have it!Butter-free, gluten free glory. Recipe from
    Rawmazing.

    Monday, July 2, 2012

    Winter warmer a la Francaise


    Thanks to a (my) wise move in subscribing to Gourmet Traveller's (GT) monthly editions, I'm on the receiving end of 12 months worth of well-edited, seasonal focused recipe mags. Ok, admitedly I arranged the subscription for my dad's Christams pressie but I'll still reserve the back-pats for a good idea! GT's July edition didn't fail to meet expectations either. Smack bang in the high of winter, GT served up the goods and threw a few Frenchie treats our way. My pick of the lot was a hearty, spruced up plate of peas. Yes, the dish of petits pois a la Francaise is said to be a "side" but if, like me, you love your greens just as much I recommend switching this into a broth-ier, soup-ier style feast to hit the spot. On a side note, if you've been the one pushing your peas to the side of your plate all your life, I'm a strong believer that this will convert you.
     Images all via my trusty iPad snaps of Australian Gourmet Traveller July 2012.

    Tuesday, June 12, 2012

    To have and to...sweeten

    via here and here

    My friend's wedding weekend is over and I'm struggling with the thought that the sweet stuff has come to an end! Thankfully, Pinterest came to the rescue when my call went out for the need of comforting goodies to be at arms reach. This food snap has left me drooling over a slice of the baked goods! Not only did I want a good excuse to post this delicious looking pic, I realised Shade of Whim lacks the recipe-type post and figured it's never too late to get a good thing started. What better way to introduce us (and my blog) to a recipe post than with Blueberry Cheesecake Bars. Don't those three words just belong together?

    Blueberry Cheesecake Bars
    Ingredients

    Base:

    Butter, for greasing
    2 tablespoon sugar
    1/8 tablespoon ground cinnamon
    9 graham crackers
    1/2 stick unsalted butter, melted

    Filling:
    16 ounces cream cheese, room temperature
    2 eggs
    2 lemons, zested and juiced
    1/2 cup sugar
    1 1/2 cups fresh blueberries

    Directions

    For the Base:
    Preheat oven to 325 degrees

    Grease the bottom of a 9 by 9-inch baking pan with butter. Then place parchment paper over the top, pressing down at the corners. In a food processor, process the sugar, cinnamon and graham crackers until you have the consistency of breadcrumbs. Add the melted butter and pulse a couple of times to fully incorporate. Pour into the lined baking pan and firmly pat down with the bottom of a glass. Bake for about 12 minutes, or until set.

    For the filling:
    Add cream cheese, eggs, lemon zest, lemon juice, and sugar to the food processor and pulse until well combined. It should have a smooth consistency. Pour onto the cooked graham cracker base and then sprinkle with blueberries. They will sink slightly but should be half exposed.

    Bake in the oven for 35-45 minutes, or until the center only slightly jiggles. Remove from the oven and cool completely before Refrigerating for at least 3 hours. Once set, remove from pan using the parchment lining and slice into 10 rectangular bars.

    Recipe adapted from Tyler Florence

    Thursday, March 15, 2012

    Dressed like a tart!


    via
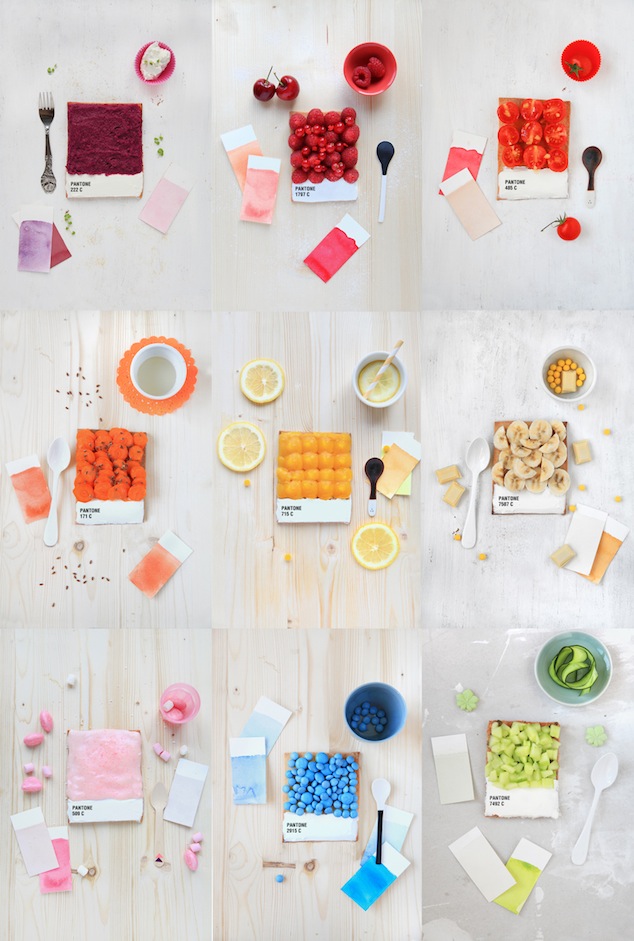
    Pantone comes in all shapes and sizes and today I introduce you to the wonderfully tartified pantone colour swatch! French food designer Emilie de Griotte developed the tarts for a special feature in French culinary magazine fricote. Get yourself some white icing, carrots, candies, berries and colourful fruity finds and recreate your own edible pantone! Tasty and visual goodness all wrapped in one.

    Check out my write up here...

    LinkWithin

    Related Posts with Thumbnails